How To Install & Setup WordPress Multisite Network – Step By Step Guide 2024
Learn how to install and setup a WordPress multisite network using this visual step-by-step guide.
WordPress comes with a built-in feature that allows you to create multiple websites or a network of WordPress sites.
A WordPress multisite network is usually used by organizations, companies, or businesses, who need to run multiple separate websites but want to control and manage them under one dashboard.
If you are totally new to WordPress, we highly advise you to check our WordPress installation guide before following this one.
A short concise summary is available after the table of content.
How To Install & Setup a WordPress Multisite Network?
- Backup your existing WordPress website if you have one.
- Verify that Pretty Permalinks work on your single WordPress instance.
- Deactivate all active plugins if you are managing a single WordPress website.
- Add: define( ‘WP_ALLOW_MULTISITE’, true ); to wp-config.php file.
- Go to Tools → Network Setup then follow the on-screen instructions.
- Go to My Sites → Network Admin → Sites then click “Add New“.
- Follow the on-screen instructions from step (6) to add a new site.
- Install plugins and themes in the WordPress multisite.
What is a WordPress Multisite Network?
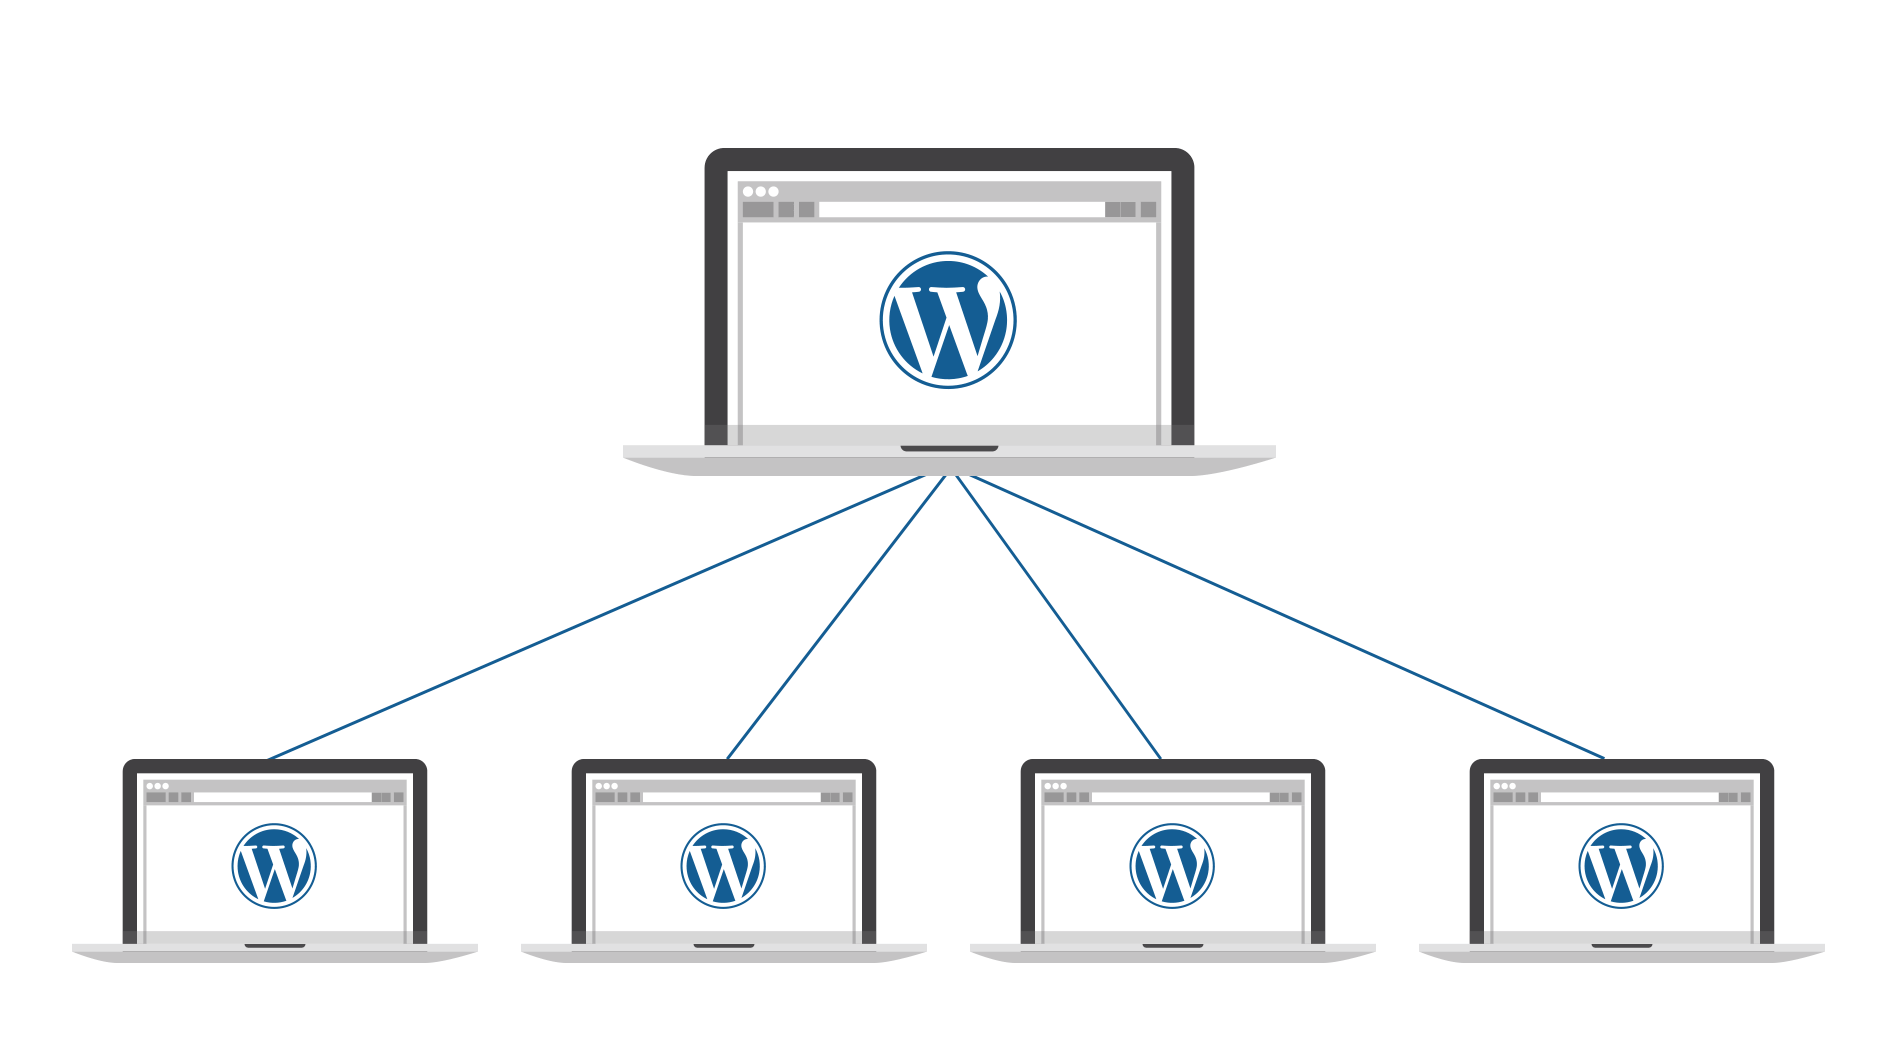
Whether you have a business with multiple branches or you run an educational site with several locations, WordPress multisite can help you manage countless websites with one WordPress account and all in one dashboard. WordPress itself uses a multisite network for their main website.
If you don’t know what it is, WordPress multisite is a built-in feature on WordPress that allows you to use one WordPress account to manage multiple websites. This gives you the ability to use one login and dashboard to operate numerous websites.
Multisite is perfect for people who use WordPress for a business with multiple branches, academic institutes with student blogs, forum sites with subforums, companies and governments with various departments, or even a network of blogs.
Multisite gives you the flexibility and scalability to make running a large network of websites easy. In this article, I will explain how to install, setup, configure, and customize a WordPress multisite.
Pros and Cons of WordPress Multisite
Pros of WordPress Multisite
- Easy Access: WordPress allows you to manage every single website in a network in one dashboard, allowing you access to everything in one place with just one login.
- Admin Control: You can make it so that every site has its own admin, you can also completely change the privileges and permissions of each admin.
- Shared Themes & Plugins: If you wish to install themes and plugins for your multisite network then you only have to download the plugins and themes once. This allows you to install and configure themes and plugins very easily.
- Bulk-Updating: Multisite makes your life much easier by letting you update ALL of your websites at once just by using the master install. When a new update rolls around, you just have to update once and all of your websites will be updated.
Cons of WordPress Multisite
- Shared Resources: The resources on your multisite network are shared by each website on the network. If your network is down for some reason, then every single website will shut down as well, and if one website is drawing too many resources or gets too much traffic then all other sites will be affected.
- Hacking Vulnerability: Since your network makes websites share resources, when you get hacked, the effects will impact the entire network. This makes it so that multisite networks are extremely vulnerable to hacking.
- Incompatibility: Simply put, many host providers and plugins do not support multisite networks, making your options much more limited when it comes to choosing host providers and plugins.
How to Set Up a Multisite Network
Activating Multisite and Pre-installation
Installing and setting up your multisite is actually much easier than you think it is, but it is highly recommended to backup your website before you do this. If you want to learn how to backup your site, then you should follow this article. Once you are done with the backup, you can proceed to the pre-installation.
Another thing to note before you convert your site to a multisite is that your hosting provider may not support multisite networks. If that is the case for you may have to change your host provider. Here at Labinator.com, we recommend HostArmada.
Lastly, you must check if PrettyPermalinks is enabled, this means your links should look like this:
https://example.com/my-page
and not this:
https://example.com/?p=2345
If PrettyPermalinks is not enabled then you need to go to your WordPress dashboard, then Settings, then Permalinks, and then in that page choose a setting for your links that isn’t Default. It is also recommended that you disable all plugins before doing this.
To convert your website into a multisite network we must activate multisite in the config file:
- First, you must log in to your host account and find your cPanel.
- Once you have arrived at your cPanel you have to navigate to the File Manager.
- In the File Manager, find the folder called “public_html“.
- Inside that folder, there will be a file called “wp-config.php“. Once you find that file, right-click on it and then select Edit.
- After clicking edit you should see a page that displays code, you need to find the line that says:
/* That’s all, stop editing! Happy blogging. */ - Above that line, there should be the line displaying the setting for multisite. Edit the line so that it says: define(‘WP_ALLOW_MULTISITE’, true);

Once you have done that you can Save Changes and then close the file. You are now done with enabling multisite, though this is only half of the process.
Choosing Domain Types
Before you install your multisite network you need to choose between your domain types. There are two main domain types when it comes to multisite; subdomains and subdirectories (aka subfolders). These two domain types change how your URLs will look for your site. Although this may seem insignificant at first, this choice is crucial.
Subdomains are used for multisites that cover many topics and niches, and they are usually less SEO friendly because they are used for multiple topics. Subdomains usually look like site1.example.com. If you choose to use subdomains then you have to do some extra setup.
Subdirectories/subfolders are more common when it comes to multisite, they are used for websites that focus on one specific niche or topic, so this makes them more SEO friendly. Subdirectory links usually look like this, example.com/site1.
If you wish to use subdirectories then there is no extra setup involved, you can skip the next section and proceed onto installing your network.
Setting Up for Subdomain
In this section I will show you how to enable subdomains if that is what you choose to use for your domain type. Enabling subdomains is fairly simple and similar to the process for activating multisite.
- To start you must log in to your host account and navigate to your cPanel as you did for activating multisite.
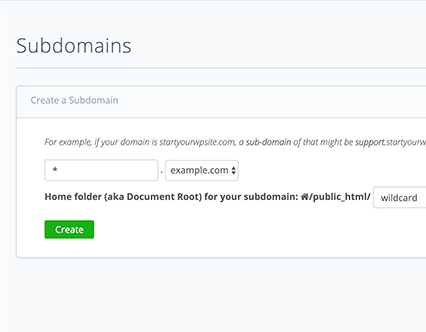
- Once you arrive at your cPanel, find the section Domains, and from their you must select Subdomains.
- A new screen should appear and from there you need to find a section labeled “Create a Subdomain“.
- When you find it, start by selecting your prefered domain, then for the text box enter the * character. Then you can select “Create” and you are now officially done with enabling subdomains!
Installing a Multisite Network:
Finally, we can get to the main part of this article! In this section, I will explain how exactly you can install your multisite now that you have finished all of the prerequisites. This will be a simple but fairly long process so I recommend that you double-check that you have done everything up until this point correctly. Now you can proceed if you are sure you have done everything correctly.
- First, go to your WordPress dashboard, then “Tools“, and then “Network Setup“.
- Afterward, start the creation process by choosing your preferred domain type (subdomain or subdirectory). Then choose a title for your network and make sure the network admin email is correct.
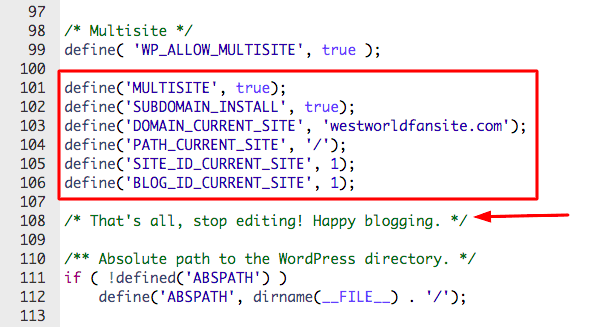
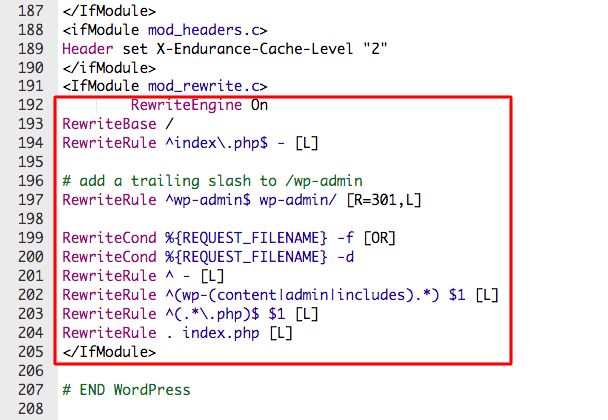
- Now, WordPress will tell you to change code in the files; wp-config and .htaccess. To find these files you need to use cPanel and the method we used earlier to find wp-config. The file .htaccess should also be in the same folder as wp-config.
- For wp-config, you must find the section above the text:
/* That’s all, stop editing! Happy blogging. */
When you find it you have to replace the text with the snippet as WordPress instructed. Then select Save Changes and move onto the second file. - For .htaccess, you need to navigate to the file of that name in the same folder as wp-config and then scroll down and find the snippet of code that looks similar to the one that was shown in WordPress. You simply need to change it like how WordPress instructed and then select “Save Changes“, now you can exit this page and return to WordPress.
Now you are finally done setting up and installing your brand new multisite network! There is no other setup required from now on, in the next sections, I will show you how to configure your network and add sites.
How to Configure and Add Sites to a Multisite Network
WordPress makes it easy to not only add sites to your network but also configure everything part of your multisite network. When you are at your WordPress dashboard, in the top-left corner there is a tab at the top called My Sites. Clicking on that allows you to configure your sites and new ones. To add a new site, follow these steps:
- Find My Sites in your WordPress dashboard, then click on it, then select “Network Admin“, and then select “Sites“.
- Afterward, a new page should appear, on that page, you need to click on “Add New“.
- Now you can enter the details for your new site, this is all up to you, and then when you’re done you need to select “Add Site“.
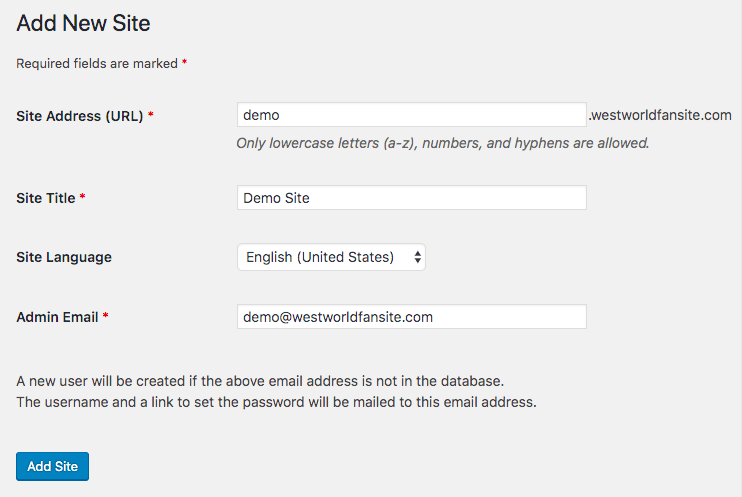
That’s it! That is all you have to do to add a site, now you can use My Sites to configure that site however you would like. In the next part, I will show you how to install plugins and themes.
How to Add Plugins and Themes to a WordPress Multisite Network
Adding themes and plugins is even easier than adding sites to your page. WordPress also allows you to add themes and plugins to your entire network at once.
How To Add Themes To WordPress Multisite Network?
To add a theme go to your dashboard, then “My Sites“, then “Network Admin“, and then “Themes“.
Now a list of all of your themes should be there. If you want to add a new then you just have to click on “Add New“.
Once your themes are installed, you can use “Network Enable” to apply them to your entire network. If you want to disable a certain theme, you can also use “Network Disable” to disable it across your entire network.
If you need help deciding on a theme for your sites, I would recommend checking this site.
How To Add Plugins To WordPress Multisite Network?
To add a theme go to your dashboard, then “My Sites“, then “Network Admin“, and then “Plugins“.
Now a list of all of your plugins should be there. If you want to add a new then you just have to click on “Add New“.
Once your plugins are installed, you can use “Network Activate” to apply them to your entire network. If you want to disable a certain plugin, you can also use “Network Disable” to disable it across your entire network.
If you need help deciding on plugins for your sites, I would recommend checking this site.
WordPress Guides
Best Collection Of WordPress Guides & Checklists
Our complete and latest collection of WordPress guides and resources that cover everything you need to get the most out of your WordPress website.
Download Them All!
All of our guides will be sent to your inbox
