How To Enable Maintenance Mode
Learn how to enable and activate Maintenance Mode for your WordPress site with and without plugins using this simple guide!
How To Enable Maintenance Mode?
- Install Minimal Maintenance Mode from Labinator.
- Create a custom page in WordPress.
- Go to the page for the plugin under Settings.
- Choose the Maintenance Mode type.
- Select the page your created for the content.
- Save changes and exit the page.
What is Maintenance Mode?
WordPress is one of the best site-creation solutions because it provides all of the features with full control for absolutely free. WordPress offers many stunning features like themes, plugins, an easy-to-use interface, and many other tools. These great features come with a well-coded foundation for your site.
Another reason that WordPress is the number-one solution for creating a website is that it rarely has problems. However, this does not mean that WordPress is perfect by any means. If you ever run into a technical issue, then one of the best things to do is activating maintenance mode on your site.
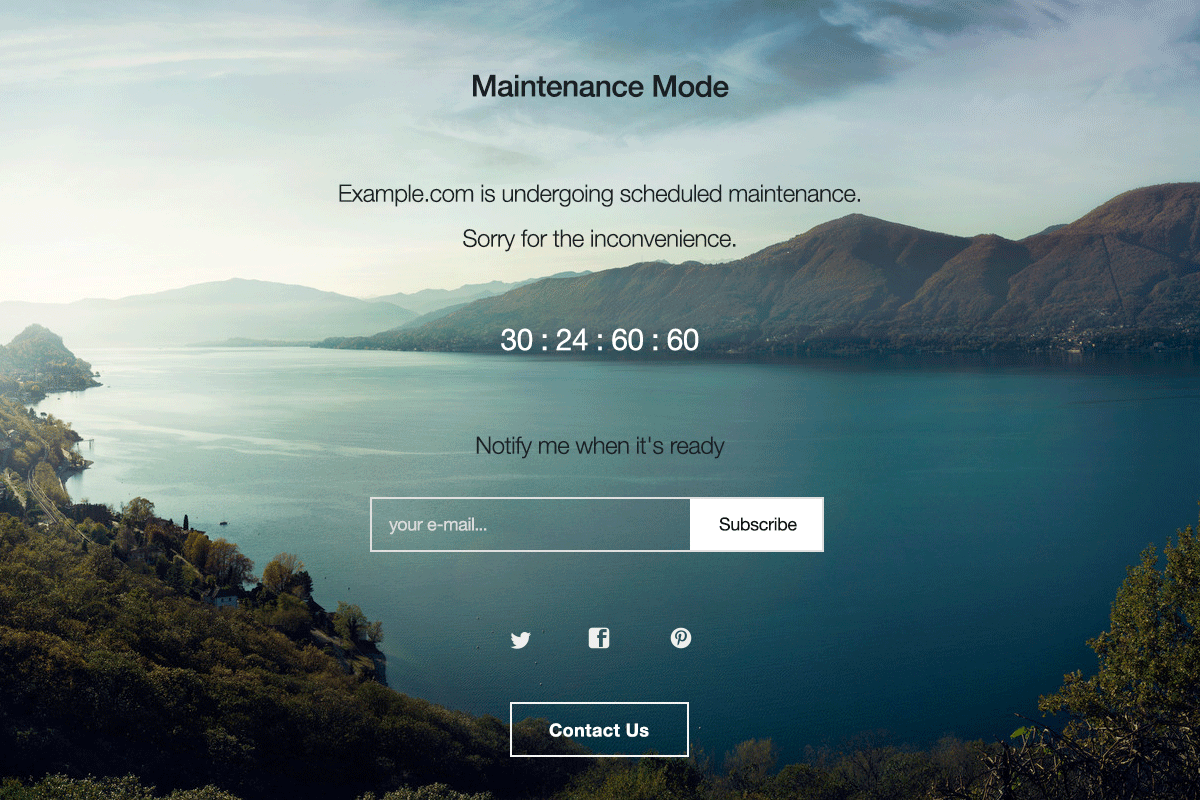
Maintenance mode for WordPress is a mode where your site temporarily shuts down for visitors. Thus allowing you to update your site, solve issues, make substantial adjustments, and other changes to your site. By using maintenance mode, you can polish your site without giving your site visitors an error message.
WordPress maintenance mode is unnecessary when adding posts, changing links, fixing small bugs, and adding plugins. You should enable maintenance mode only when it is necessary to do so. Enable maintenance mode if you are extensively changing or overhauling your site. It can also be used for re-branding or creating a “coming soon” page.
Now that you know when and why to use maintenance mode, I can show you how to set it up. There are various ways to enable maintenance mode range from changing code in your theme to using a plugin. This short guide will cover the three main methods for applying and using maintenance mode in WordPress.
Enable Using a Plugin
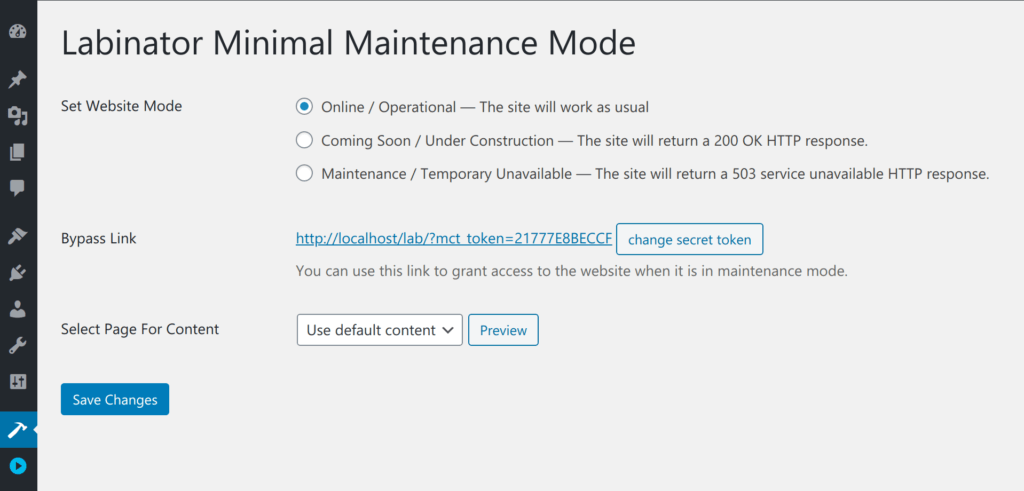
- Install and activate the plugin from Labinator.
- Create a custom page if you don’t want default content.
- Then go to the plugin page under Settings.
- Choose the maintenance mode type you want.
- Select the page you want for the content.
- Save changes and exit the page.
Enable Using a Page Builder
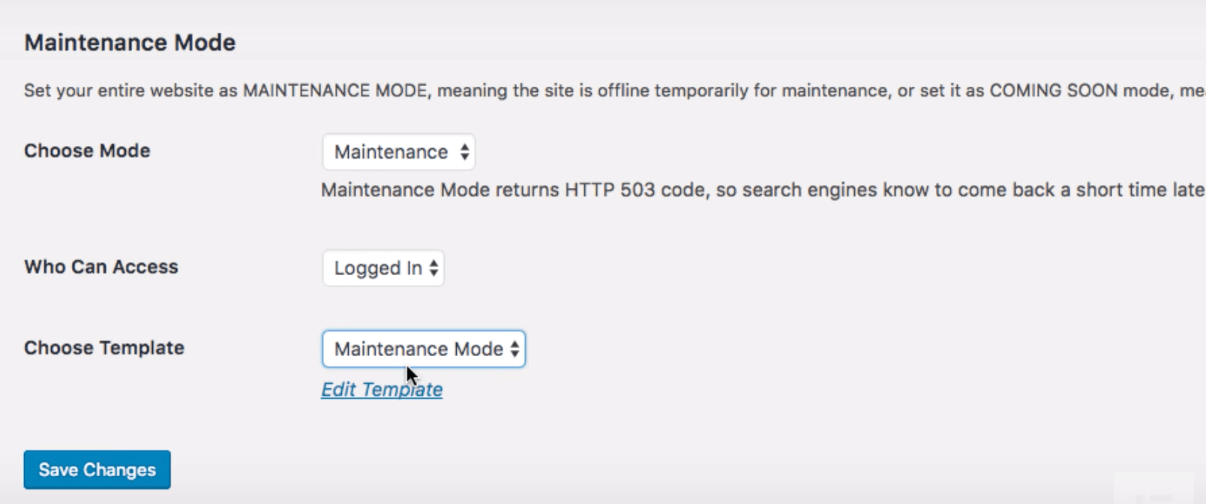
Many page builders have a built-in maintenance mode tool. One of the most popular page builders, Elementor, has one such option. If you want to create a stunning page for your maintenance mode without installing a plugin, this route is a great choice. To use this method, you need to have Elementor or another page builder like it.Elementor allows you to create a template with their page builder and then display it when your site has entered maintenance mode. Templates are useful because they can be made quickly and provide full customizability. If you want great templates for Elementor, then you should check out the Labinator template collection!
To use Elementor for maintenance mode, follow these steps:
- Install Elementor to your site.
- Go to Templates under Elementor in your dashboard.
- Create a new template there and publish it.
- Then go to Tools in the Elementor page on your dashboard.
- Navigate to the Maintenance Mode page.
- Change your permissions if necessary.
- Then select the template you created earlier.
- Save your changes and exit the page.
Enable Using No Plugins
The primary method to enable maintenance mode without plugins is by changing code in your WordPress files. This method is very rudimentary and might not look the best when compared to using a plugin. This method will also require you to change code, which I highly don’t recommend. You should also create a backup of your site before doing this.
To do this process, follow these steps below:
- Go to your WordPress dashboard.
- Then go toTheme Editor under Appearance.
- Find the functions.php file on the right.
- Open the file in the code editor.
- Add this code to the bottom:
function wp_maintenance_mode() {
if (!current_user_can('edit_themes') || !is_user_logged_in()) {
wp_die('Under Maintenance
Website under planned maintenance. Please check back later.'); } } add_action('get_header', 'wp_maintenance_mode');
After adding this code, you must click on Update File. You can change the placeholder text inside of the parentheses to whatever you want. Then open your WordPress site and check if the maintenance mode is working correctly. If you want to reset this process, then delete the code from the bottom of the file.
Your Perfect WordPress Solution
In conclusion, I hoped that this tutorial helped you in enabling maintenance mode. There are a lot of listed methods here perfect for anyone from WordPress beginners to professionals. Just remember to take precautions and preparations when changing your site.
If this tutorial helped you, then you check out more awesome ones here! If you want high-quality WordPress products and services, we have the perfect solution for you.
Labinator provides stunning themes, feature-rich plugins, expert services, and more, all for affordable prices. They also give you a 30-day money-back guarantee that comes with 24/7 customer support and lifetime updates.
WordPress Guides
Best Collection Of WordPress Guides & Checklists
Our complete and latest collection of WordPress guides and resources that cover everything you need to get the most out of your WordPress website.


Download Them All!
All of our guides will be sent to your inbox
